> ## Documentation Index
> Fetch the complete documentation index at: https://developers.chatwoot.com/llms.txt
> Use this file to discover all available pages before exploring further.
# Setting Up TikTok Channel
> Configure TikTok Business Messaging integration to manage TikTok conversations from Chatwoot
The TikTok channel integration enables you to manage TikTok Business Messaging conversations directly from Chatwoot. Agents can receive and reply to messages from TikTok users, view shared posts, and handle image attachments -all within the Chatwoot dashboard.
Setting up the TikTok channel involves 7 steps.
1. Create a TikTok Developer Account.
2. Register an app in the TikTok Developer Portal.
3. Apply for Business Messaging API access.
4. Configure app permissions and redirect URLs.
5. Configure Chatwoot with the `App ID` and `App Secret` obtained from TikTok.
6. Set up the webhook for incoming messages.
7. Connect a TikTok Business Account from the Chatwoot dashboard.
## Prerequisites
1. A self-hosted Chatwoot instance accessible via a public HTTPS URL
2. A **TikTok Business Account** registered in an eligible region
3. Your TikTok Business Account must be set to **accept direct messages from everyone**. Otherwise, you will need to manually accept messages in the TikTok app. [Learn how to update your message settings](https://ads.tiktok.com/help/article/how-to-update-your-tiktok-direct-message-permission-for-tiktok-messaging-ads?lang=en).
4. A **TikTok Developer Account** at [developers.tiktok.com](https://developers.tiktok.com)
5. Access to the [TikTok Business Messaging API](https://business-api.tiktok.com/portal/docs?id=1832183871604753) (requires special permissions and approval)
6. Super Admin access to your Chatwoot instance
The TikTok Business Messaging API is **region-restricted**. It is currently unavailable for accounts registered in the **European Economic Area (EEA), Switzerland, or the United Kingdom**. Personal TikTok accounts are not supported -only TikTok Business Accounts can use this integration.
## Step 1: Create a TikTok Developer Account
1. Go to [developers.tiktok.com](https://developers.tiktok.com) and sign up
2. Verify your email address
3. Accept the Terms of Service
## Step 2: Register Your App
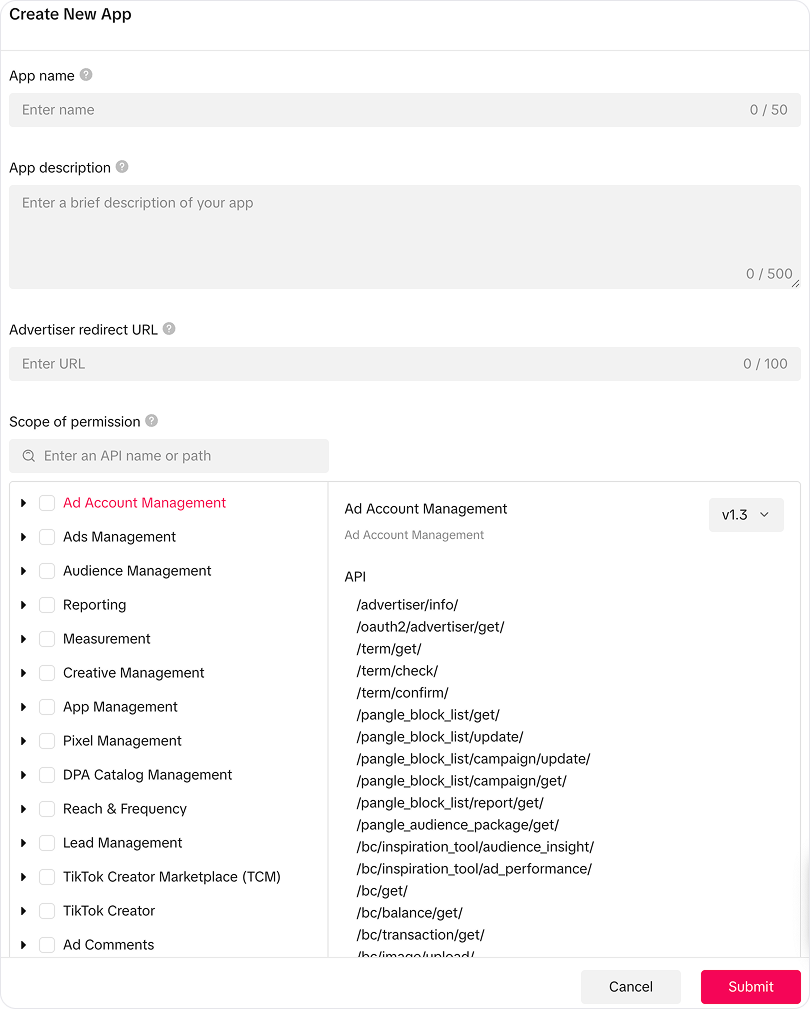 1. Go to [business-api.tiktok.com/portal/apps](https://business-api.tiktok.com/portal/apps) and create a new app
2. Fill in the required fields:
* **App Name**: e.g., "Your Company - Chatwoot"
* **App Description**: Brief description of your messaging use case
* **App Icon**: Upload your company logo
* **Terms of Service URL**: Your company's ToS URL
* **Privacy Policy URL**: Your company's privacy policy URL
3. Once created, note down your `App ID` (client key) and `App Secret` (client secret)
## Step 3: Apply for Business Messaging API Access
You need to grant your app access to the Business Messaging API. For detailed instructions, refer to the [TikTok Business Messaging API access guide](https://business-api.tiktok.com/portal/docs?id=1832184145137922).
1. Open your app in the TikTok Developer Portal
2. Navigate to the **Business Messaging API** product
3. Submit an application with:
* Your use case (e.g., customer support via Chatwoot)
* How you will handle user data
* Your organization details
4. Wait for TikTok's review and approval
Approval typically takes a few days but can take longer for specialized access. You cannot proceed with the integration until your application is approved.
## Step 4: Configure App Permissions and URLs
Once approved, configure the following in the TikTok Developer Portal.
### Required Permissions
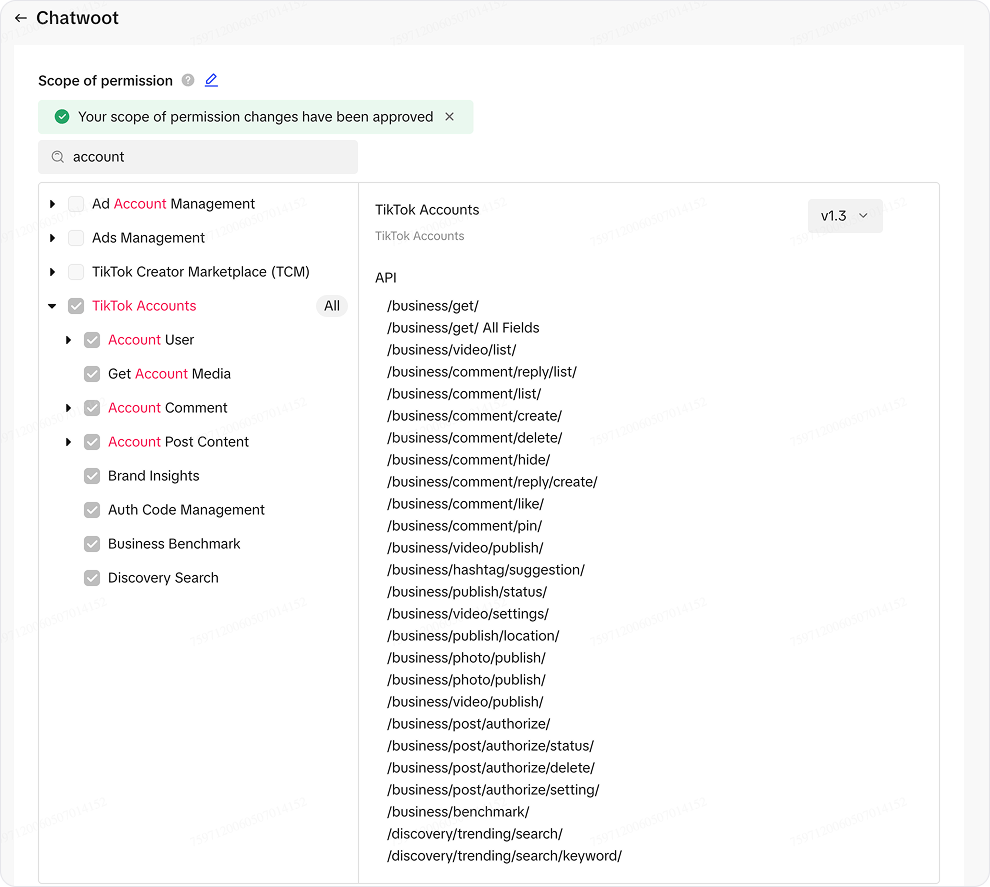
After your app is approved, ensure the **TikTok Accounts** permission is enabled under **Scope of permission** in your app settings.
1. Go to [business-api.tiktok.com/portal/apps](https://business-api.tiktok.com/portal/apps) and create a new app
2. Fill in the required fields:
* **App Name**: e.g., "Your Company - Chatwoot"
* **App Description**: Brief description of your messaging use case
* **App Icon**: Upload your company logo
* **Terms of Service URL**: Your company's ToS URL
* **Privacy Policy URL**: Your company's privacy policy URL
3. Once created, note down your `App ID` (client key) and `App Secret` (client secret)
## Step 3: Apply for Business Messaging API Access
You need to grant your app access to the Business Messaging API. For detailed instructions, refer to the [TikTok Business Messaging API access guide](https://business-api.tiktok.com/portal/docs?id=1832184145137922).
1. Open your app in the TikTok Developer Portal
2. Navigate to the **Business Messaging API** product
3. Submit an application with:
* Your use case (e.g., customer support via Chatwoot)
* How you will handle user data
* Your organization details
4. Wait for TikTok's review and approval
Approval typically takes a few days but can take longer for specialized access. You cannot proceed with the integration until your application is approved.
## Step 4: Configure App Permissions and URLs
Once approved, configure the following in the TikTok Developer Portal.
### Required Permissions
After your app is approved, ensure the **TikTok Accounts** permission is enabled under **Scope of permission** in your app settings.
 ### Authorization Redirect URL
Set the authorization redirect URL to:
`{Chatwoot installation url}/tiktok/callback`
## Step 5: Configure Chatwoot
### Super Admin Configuration
1. Log in to your Chatwoot instance as a Super Admin
2. Navigate to `{Chatwoot installation url}/super_admin/app_config?config=tiktok`
3. Enter your `TikTok App ID` and `TikTok App Secret`
4. Click **Submit**
Alternatively, you can set these as environment variables:
```bash theme={null}
TIKTOK_APP_ID=your_tiktok_app_id
TIKTOK_APP_SECRET=your_tiktok_app_secret
```
Restart the Chatwoot server after making changes.
### Enable TikTok Feature
1. In Super Admin, navigate to **Accounts**
2. Select the account where you want to enable TikTok
3. Under **Features**, enable the **TikTok** channel
4. Save the changes
TikTok will only show up in the inbox channel options once you have configured the App ID and App Secret and enabled the feature for the account.
## Step 6: Configure Webhook
Set up the TikTok webhook to receive incoming messages. Open a Rails console on your Chatwoot server:
```bash theme={null}
bundle exec rails console
```
Run the following command to register the webhook callback URL:
```ruby theme={null}
Tiktok::AuthClient.update_webhook_callback
```
This sets the webhook URL to `{Chatwoot installation url}/webhooks/tiktok`.
You can verify the webhook configuration by running:
```ruby theme={null}
Tiktok::AuthClient.webhook_callback
```
The webhook must be configured **after** setting the TikTok App ID and App Secret in Super Admin. If you change your Chatwoot domain, you will need to run this command again.
## Step 7: Connect Chatwoot with Your TikTok Account
Follow the [TikTok channel user guide](https://www.chatwoot.com/hc/user-guide/articles/1769595702-how-to-setup-a-tik_tok-channel) to complete the TikTok integration.
## Troubleshooting
### TikTok channel not appearing in inbox options
* Verify the TikTok feature is enabled for the account in Super Admin
* Confirm `TIKTOK_APP_ID` and `TIKTOK_APP_SECRET` are set correctly
* Restart the Chatwoot server after configuration changes
### OAuth authorization fails
* Ensure the redirect URL in the TikTok Developer Portal exactly matches `{Chatwoot installation url}/tiktok/callback`
* Verify your TikTok app has all required scopes enabled
* Check that your TikTok app is approved for the Business Messaging API
### Not receiving incoming messages
* Verify the webhook is configured by running `Tiktok::AuthClient.webhook_callback` in Rails console
* Ensure the webhook URL is publicly accessible over HTTPS
* Check that your TikTok Business Account is in an eligible region
* Review Sidekiq logs for `Webhooks::TiktokEventsJob` errors
### Messages failing to send
* Check if the 48-hour reply window has expired
* Verify the access token is valid -Chatwoot automatically refreshes tokens, but if the refresh token expires (30 days), the channel will need reauthorization
* Ensure you are sending a supported message type (text only, or a single image)
* Check Sidekiq logs for `SendReplyJob` errors
### Channel shows "Reauthorization Required"
This happens when both the access token (around 24 hours) and refresh token (around 30 days) have expired, typically due to inactivity.
1. Go to **Settings** → **Inboxes** → select the TikTok inbox
2. Click **Reauthorize**
3. Complete the TikTok OAuth flow again
### Webhook signature verification fails
* Ensure `TIKTOK_APP_SECRET` matches the secret in your TikTok Developer Portal
* Check server clock synchronization -TikTok's signature verification requires timestamps within 5 seconds
### Authorization Redirect URL
Set the authorization redirect URL to:
`{Chatwoot installation url}/tiktok/callback`
## Step 5: Configure Chatwoot
### Super Admin Configuration
1. Log in to your Chatwoot instance as a Super Admin
2. Navigate to `{Chatwoot installation url}/super_admin/app_config?config=tiktok`
3. Enter your `TikTok App ID` and `TikTok App Secret`
4. Click **Submit**
Alternatively, you can set these as environment variables:
```bash theme={null}
TIKTOK_APP_ID=your_tiktok_app_id
TIKTOK_APP_SECRET=your_tiktok_app_secret
```
Restart the Chatwoot server after making changes.
### Enable TikTok Feature
1. In Super Admin, navigate to **Accounts**
2. Select the account where you want to enable TikTok
3. Under **Features**, enable the **TikTok** channel
4. Save the changes
TikTok will only show up in the inbox channel options once you have configured the App ID and App Secret and enabled the feature for the account.
## Step 6: Configure Webhook
Set up the TikTok webhook to receive incoming messages. Open a Rails console on your Chatwoot server:
```bash theme={null}
bundle exec rails console
```
Run the following command to register the webhook callback URL:
```ruby theme={null}
Tiktok::AuthClient.update_webhook_callback
```
This sets the webhook URL to `{Chatwoot installation url}/webhooks/tiktok`.
You can verify the webhook configuration by running:
```ruby theme={null}
Tiktok::AuthClient.webhook_callback
```
The webhook must be configured **after** setting the TikTok App ID and App Secret in Super Admin. If you change your Chatwoot domain, you will need to run this command again.
## Step 7: Connect Chatwoot with Your TikTok Account
Follow the [TikTok channel user guide](https://www.chatwoot.com/hc/user-guide/articles/1769595702-how-to-setup-a-tik_tok-channel) to complete the TikTok integration.
## Troubleshooting
### TikTok channel not appearing in inbox options
* Verify the TikTok feature is enabled for the account in Super Admin
* Confirm `TIKTOK_APP_ID` and `TIKTOK_APP_SECRET` are set correctly
* Restart the Chatwoot server after configuration changes
### OAuth authorization fails
* Ensure the redirect URL in the TikTok Developer Portal exactly matches `{Chatwoot installation url}/tiktok/callback`
* Verify your TikTok app has all required scopes enabled
* Check that your TikTok app is approved for the Business Messaging API
### Not receiving incoming messages
* Verify the webhook is configured by running `Tiktok::AuthClient.webhook_callback` in Rails console
* Ensure the webhook URL is publicly accessible over HTTPS
* Check that your TikTok Business Account is in an eligible region
* Review Sidekiq logs for `Webhooks::TiktokEventsJob` errors
### Messages failing to send
* Check if the 48-hour reply window has expired
* Verify the access token is valid -Chatwoot automatically refreshes tokens, but if the refresh token expires (30 days), the channel will need reauthorization
* Ensure you are sending a supported message type (text only, or a single image)
* Check Sidekiq logs for `SendReplyJob` errors
### Channel shows "Reauthorization Required"
This happens when both the access token (around 24 hours) and refresh token (around 30 days) have expired, typically due to inactivity.
1. Go to **Settings** → **Inboxes** → select the TikTok inbox
2. Click **Reauthorize**
3. Complete the TikTok OAuth flow again
### Webhook signature verification fails
* Ensure `TIKTOK_APP_SECRET` matches the secret in your TikTok Developer Portal
* Check server clock synchronization -TikTok's signature verification requires timestamps within 5 seconds