Windows Development Setup
This guide will walk you through setting up your Windows development environment for contributing to Chatwoot. We’ll use Windows Subsystem for Linux 2 (WSL2) which provides the best development experience on Windows.Requirements
You need to install the Windows Subsystem for Linux 2 (WSL2) on your Windows machine.Prerequisites
- Windows 10 version 2004 and higher (Build 19041 and higher) or Windows 11
- Administrator privileges on your Windows machine
Step 1: Enable Developer Mode
The first step is to enable “Developer mode” in Windows. You can do this by opening up Settings and navigating to “Update & Security”. In there, choose the tab on the left that reads “For Developers”. Turn the “Developer mode” toggle on to enable it.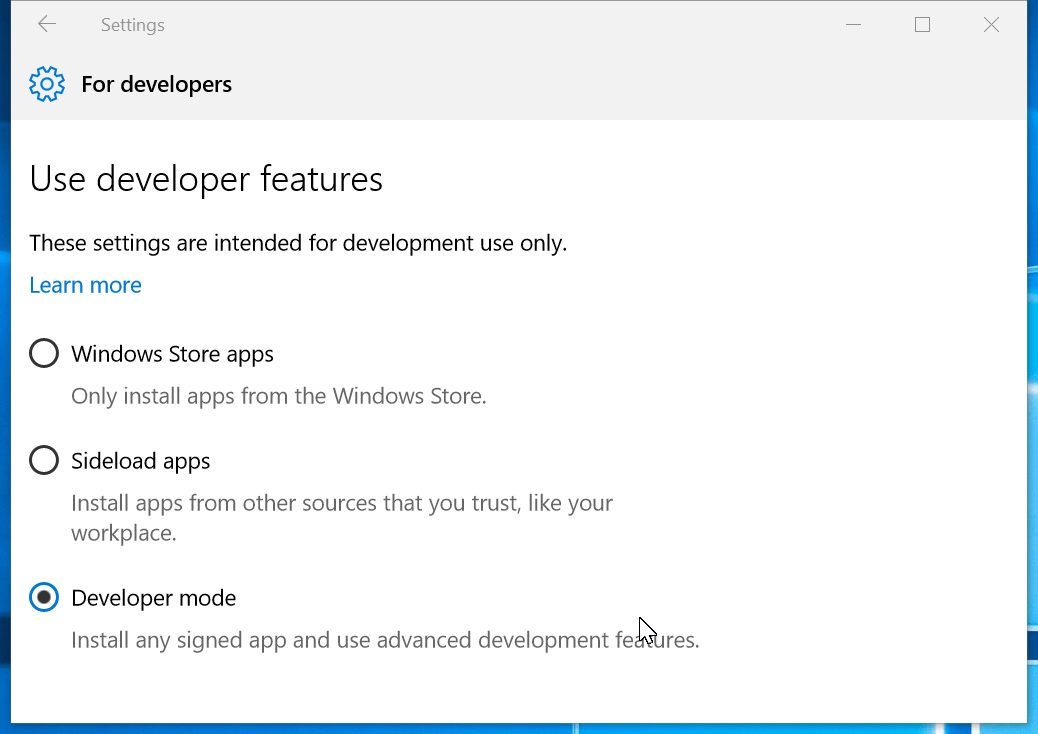
Step 2: Enable Windows Subsystem for Linux
Next you have to enable the Windows Subsystem for Linux. Open the “Control Panel” and go to “Programs and Features”. Click on the link on the left “Turn Windows features on or off”. Look for the “Windows Subsystem for Linux” option and select the checkbox next to it.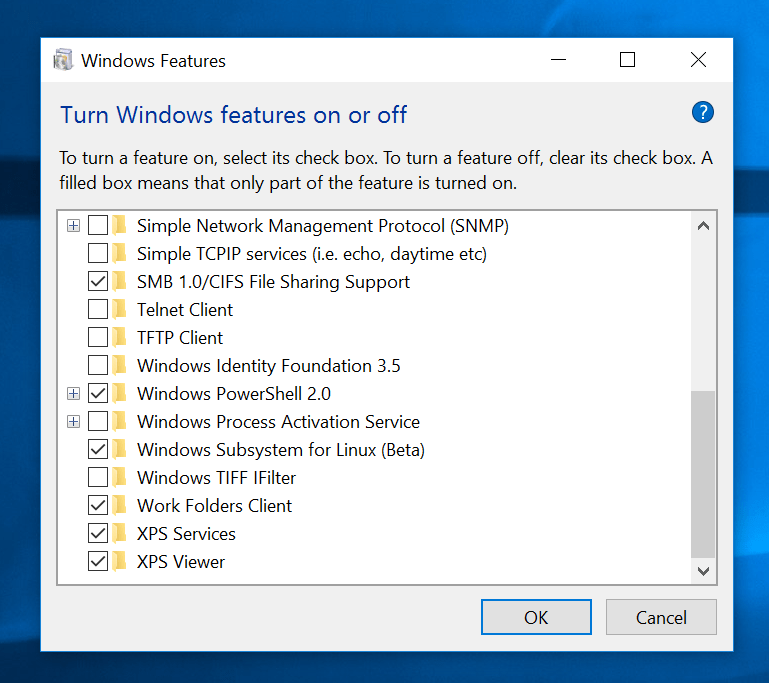
- ✅ Windows Subsystem for Linux
- ✅ Virtual Machine Platform
Step 3: Install WSL2 and Ubuntu
Option 1: Using Microsoft Store (Recommended)
- Open Microsoft Store and search for “Ubuntu”
- Install Ubuntu 22.04 LTS (or latest LTS version)
- Launch Ubuntu from the Start Menu
Option 2: Using Command Line
Open PowerShell as Administrator and run:Step 4: Initial Ubuntu Setup
When you first launch Ubuntu, you’ll be prompted to create a user account:Step 5: Install Core Dependencies
You need core Linux dependencies installed in order to install Ruby and other tools.Installing RVM & Ruby
Install additional dependencies required for RVM:Install Node.js
Chatwoot requires Node.js version 20. Install Node.js from NodeSource using the following commands:Install pnpm
We usepnpm as the package manager for better performance:
Install PostgreSQL
The database used in Chatwoot is PostgreSQL. Use the following commands to install PostgreSQL:libpq-dev dependencies for Ubuntu:
Install Redis Server
Chatwoot uses Redis server for agent assignments and reporting. To installredis-server:
Install ImageMagick
Chatwoot uses ImageMagick for image processing:Configure Git
Set up Git with your information:Windows-Specific Configuration
Install VS Code with WSL Extension
- Install Visual Studio Code on Windows from https://code.visualstudio.com/
- Install Remote - WSL extension from the Extensions marketplace
- Open your project in WSL by running
code .from your WSL terminal
Configure File Permissions
WSL2 may have file permission issues. Fix them:Environment Verification
Verify all installations are working correctly:Troubleshooting Common Issues
WSL installation fails
WSL installation fails
Solution: Ensure virtualization is enabled in BIOS and Windows features are properly enabled:
- Restart computer and enter BIOS settings
- Enable Intel VT-x or AMD-V virtualization
- Enable Hyper-V in Windows Features
- Restart and try installation again
Ubuntu terminal won't open
Ubuntu terminal won't open
Solution: Reset WSL or reinstall Ubuntu:
PostgreSQL fails to start
PostgreSQL fails to start
Solution: Check if Windows PostgreSQL service is conflicting:
Permission denied errors
Permission denied errors
Solution: Fix file permissions:
Slow performance
Slow performance
Solution: Ensure code is stored in WSL2 filesystem:
- Common Errors: Check Common Errors
- WSL2 Documentation: Microsoft WSL Documentation
- Discord Community: Join our Discord
- GitHub Issues: Create an issue
Your Windows development environment with WSL2 is now ready for Chatwoot development! 🪟🐧